
I’ll never forget the first time I encountered proper banana pudding at my grandmother’s Sunday dinner in Charleston. The contrast of silky custard against those slightly softened vanilla wafers literally changed my dessert perspective forever. Twenty years and countless iterations later, I’m still perfecting those flavors—just in more individualized, guest-friendly portions. Banana pudding cups ain’t just convenient; they’re a revolutionary way to present this beloved Southern classic.
What makes banana pudding cups so special? They transform a homey, sometimes messy dessert into elegant, perfectly-portioned delights that maintain all the nostalgic flavor while adding presentation wow-factor. Their individual serving style also solves the age-old problem of the communal banana pudding bowl, where the first few servings are picture-perfect but the last few resemble a delicious but visually disappointing mush.
Ingredients & Substitutions
The soul of exemplary banana pudding cups depends heavily on quality components and thoughtful preparation. Let’s break down what you’ll need:
For the Vanilla Custard Base:
- 4 large egg yolks (room temperature)
- 1/2 cup granulated sugar
- 1/4 cup cornstarch
- 1/4 teaspoon fine sea salt
- 2 cups whole milk
- 1 cup heavy cream
- 2 teaspoons pure vanilla extract (or 1 vanilla bean, split and scraped)
- 3 tablespoons unsalted butter, cubed
For Assembly:
- 1 box (11 oz) vanilla wafers or Nilla Wafers
- 4-5 ripe bananas (spotted but firm, not mushy)
- 1 cup heavy cream
- 2 tablespoons powdered sugar
- 1/2 teaspoon vanilla extract
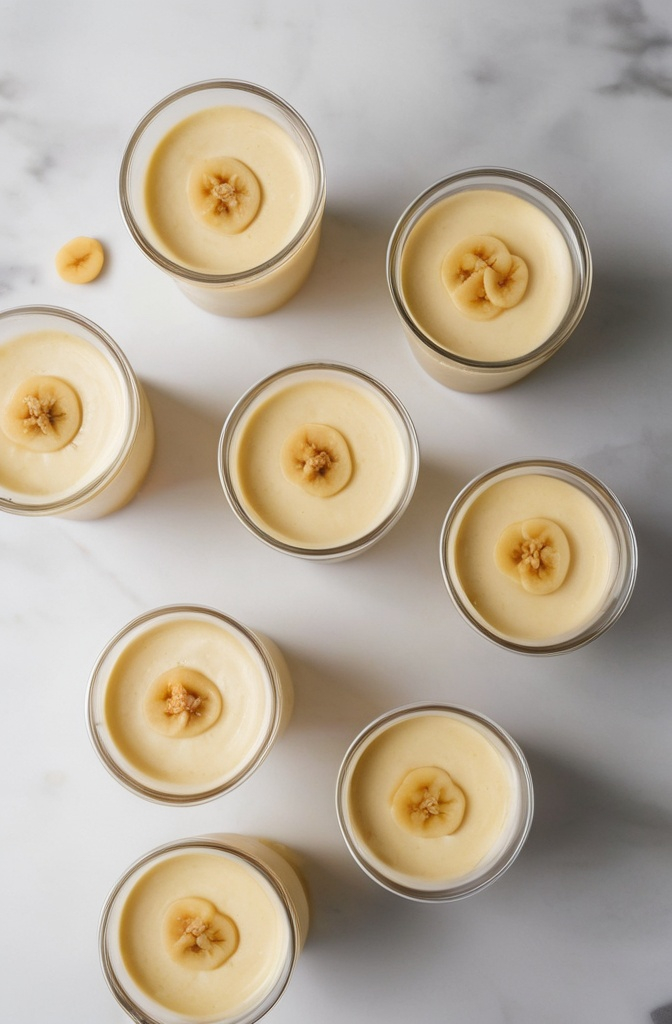
- 8-10 serving cups or glasses (8 oz mason jars work beautifully)
Those with lactose sensitivities can replace dairy milk with oat milk for comparable creaminess, tho the custard might set slightly softer. For a modern twist, consider coconut milk as your liquid base—it pairs spectacularly with bananas and adds subtle tropical notes.
Gluten-free folks needn’t miss out on this dessert experience! Gluten-free vanilla wafers are increasingly available, or substitute with crumbled gluten-free shortbread cookies. The textural contrast remains equally satisfying.
When selecting bananas, color is your guide. You want them yellow with brown spotting—what some might call “too ripe” for eating fresh. These bananas deliver maximum flavor while still maintaining structural integrity when sliced. Green-tipped bananas lack depth and will taste starchy and flat in your pudding cups.
Step-by-Step Instructions
Making the Custard Base:
- Prepare your mise en place by measuring all ingredients and having them ready. This prevents the common mistake of scrambling your eggs or overcooking your custard while searching for ingredients. Have a fine mesh strainer positioned over a heat-proof bowl nearby.
- In a medium bowl, whisk egg yolks until slightly lightened in color. Don’t skimp on this step—proper aeration here contributes to that silky-smooth final texture we’re after. Set aside.
- Combine sugar, cornstarch, and salt in a medium saucepan, whisking to eliminate any cornstarch lumps. Dry-mixing these ingredients first is crucial for preventing clumping when liquids are added.
- Gradually whisk in milk and cream until smooth, then place over medium heat. Cook, whisking constantly (not occasionally—constantly!), until mixture begins to simmer and thicken slightly, about 4-5 minutes.
- Temper the egg yolks by slowly streaming about 1 cup of the hot milk mixture into the eggs while whisking vigorously. This gradual temperature increase prevents the classic beginner mistake of scrambling your eggs.
- Return the tempered egg mixture to the saucepan, whisking continually. Cook over medium-low heat until the custard thickens to coat the back of a wooden spoon and holds a line when you run your finger through it, approximately 2-3 minutes. If bubbles start forming too rapidly, lower your heat immediately.
- Remove from heat and immediately whisk in vanilla and butter until completely incorporated. The residual heat will melt the butter, adding richness and a subtle glossy finish to your custard.
- Pour custard through the prepared strainer into your heat-proof bowl to remove any potential lumps or coagulated egg bits. This step seems fussy but makes the difference between professional-quality custard and homestyle.
- Press plastic wrap directly onto the surface of the custard to prevent skin formation and refrigerate until chilled and set, at least 2 hours but preferably 4. For expedience, you can spread the custard in a shallow dish to cool faster, but patience yields the best texture.
Assembly:
- About 30 minutes before assembly, remove your custard from the refrigerator to soften slightly—this makes layering much easier. Slice bananas into 1/4-inch rounds just before assembly to prevent browning.
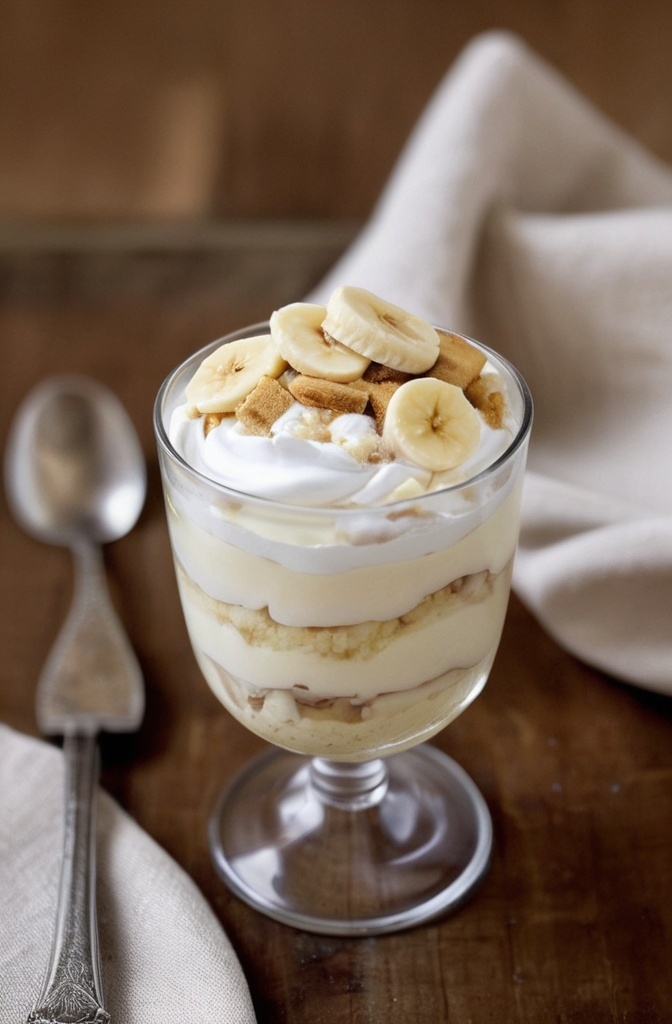
- Begin by placing a single vanilla wafer in the bottom of each serving cup. This creates a stable foundation and ensures every bite includes that signature cookie element.
- Add a thin layer of custard (about 2 tablespoons) to each cup, followed by a layer of banana slices, slightly overlapping them for structural integrity and consistent flavor distribution.
- Crush a few wafers coarsely between your fingers and sprinkle over the bananas. The varied texture between whole and crushed wafers creates interesting mouthfeel that keeps guests engaged throughout the dessert experience.
- Repeat the layering process—custard, bananas, crushed wafers—until the cups are filled to about 3/4 capacity, ensuring you reserve room for the whipped cream topping. Aim for at least three distinct layers for visual appeal.
- For the final custard layer, use the back of a spoon to create a smooth, slightly domed surface. This professional touch makes the presentation more deliberate and refined.
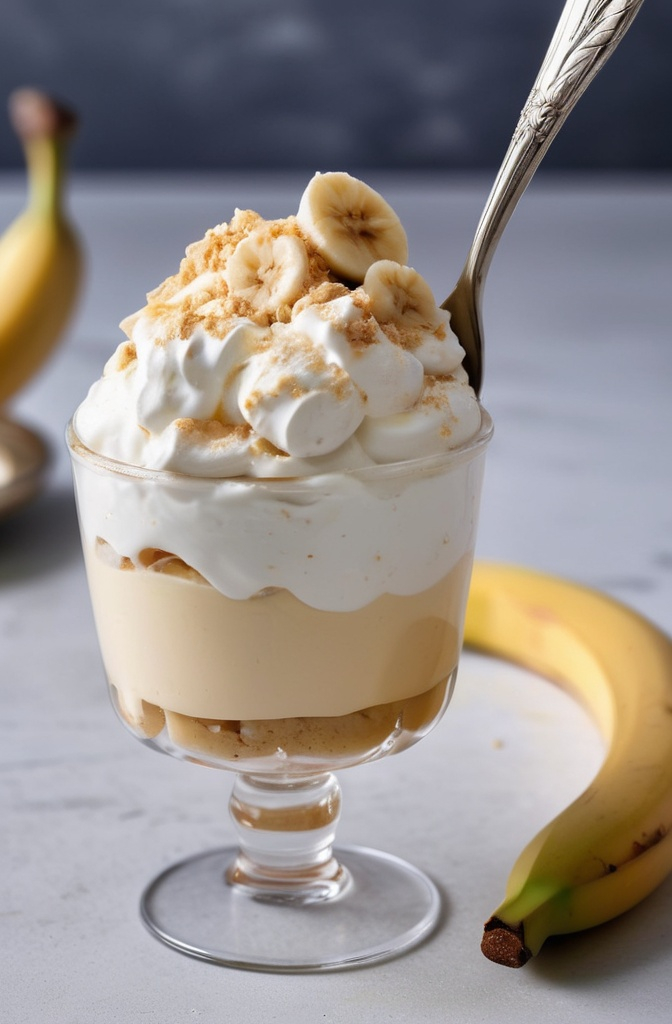
- Whip heavy cream with powdered sugar and vanilla until medium-stiff peaks form. Don’t overwhip or you’ll make butter! Watch carefully once soft peaks begin to form.
- Transfer whipped cream to a piping bag fitted with a large star tip (I prefer Ateco #866) and pipe decorative swirls on top of each pudding cup. Alternatively, dollop with a spoon for a more rustic presentation.
- Garnish with a vanilla wafer pressed partially into the cream, a thin banana slice, or a light dusting of crushed wafers for visual interest.
- For optimal texture, allow assembled cups to rest in refrigerator for at least 1 hour before serving. This resting period allows the cookies to soften slightly and the flavors to meld together beautifully.
If making ahead, delay adding the banana slices untill just before the final assembly and serving—this prevents the unappetizing browning that occurs when bananas are exposed to air for extended periods.
Cooking Techniques & Science
The magic of banana pudding cups lies in understanding the science behind custard making and the chemical changes bananas undergo during ripening. Custard thickens through a process called gelatinization—when cornstarch granules absorb liquid, swell, and eventually burst, releasing amylose molecules that create a network that traps water and thickens the mixture. This process begins around 150°F (65°C) and completes around 180°F (82°C).
Overheating your custard breaks down these starch networks, resulting in a thinner consistency—this is why constant attention and proper temperature control are non-negotiable. Many home cooks make the fatal mistake of cranking the heat to speed the process, only to end up with sweet scrambled eggs or runny pudding.
The bananas themselves contain an enzyme called polyphenol oxidase, which causes browning when exposed to oxygen—similar to what happens with avocados and apples. A light brush of lemon juice can slow this process if you’re preparing components ahead, but the acid may slightly alter the flavor profile of your dessert.
The softening of the vanilla wafers is another crucial scientific element—it’s not merely absorption of moisture, but rather a controlled breakdown of the cookie’s structure. The cookies contain starch that undergoes retrogradation when moistened by the custard, creating that signature tender-yet-intact texture that defines perfect banana pudding. Allowing too much time results in mushy cookies; too little time leaves them too crisp.
Traditional banana pudding recipes often call for the entire assembled dessert to be baked briefly. We’ve eliminated this step in our cup version to maintain the distinct layering and visual appeal, while still achieving ideal texture through proper resting time.
Serving & Pairing Suggestions
Presentation elevates these banana pudding cups from mere dessert to memorable culinary experience. Consider serving in clear glass vessels to showcase the beautiful layering—mason jars, coupe glasses, or even martini glasses all work wonderfully depending on your event’s formality level.
Temperature matters significantly when serving custard desserts. Remove cups from refrigeration about 15-20 minutes before serving to allow the custard to warm slightly, which enhances both flavor perception and creaminess. Cold dulls flavor receptors; room temperature awakens them.
For plating in fine dining contexts, place each pudding cup off-center on a small plate with a contrasting element—perhaps a quenelle of dark chocolate sorbet or a delicate tuile cookie—to create visual balance and textural counterpoint.
Pairing beverages depends on your serving occasion. For brunch service, a sparkling moscato complements the dessert’s sweetness beautifully. After dinner, consider an aged rum with caramel notes or even a medium-roast coffee with natural banana flavor notes (common in certain Ethiopian beans).
For larger gatherings or catering situations, consider a “banana pudding bar” where guests can build their own cups from separate components. This interactive approach adds entertainment value while solving the timing challenges of pre-assembled custard desserts.
Variations on the Classic
The foundation recipe provides endless opportunities for creative interpretations:
- Chocolate Banana Pudding Cups: Add 4 ounces of melted dark chocolate to your custard base and substitute chocolate wafers for vanilla ones. The bitterness of good chocolate balances the banana’s sweetness perfectly.
- Bourbon-Caramel Edition: Add 2 tablespoons of quality bourbon to your custard and layer with homemade caramel sauce between the banana layers. This sophisticated version appeals to adult palates.
- Tropical Twist: Incorporate 1/2 cup toasted coconut into your layers and substitute some banana with fresh mango cubes. Finish with a passion fruit coulis for bright acidity.
- Banana Foster Inspiration: Quickly sauté banana slices in butter, brown sugar, and rum before layering. The caramelization intensifies flavor and adds complexity that traditional raw banana slices lack.
- Deconstructed Presentation: For modern plating, create a pudding quenelle, place broken wafer pieces artistically, add brûléed banana slices, and finish with spherified vanilla cream for a molecular gastronomy approach.
Troubleshooting Common Issues
Even professional pastry chefs occasionally encounter challenges with custard-based desserts. Here are solutions to the most common problems:
Lumpy Custard: Prevention is key through proper tempering, but if lumps develop, pass the custard through a fine-mesh sieve while still hot. Some chefs even use an immersion blender for particularly stubborn lumps, though this risks over-activating the starch.
Weeping Custard: That unpleasant liquid separation usually indicates overcooked eggs. Maintain strict temperature control and consider using a thermometer until you develop an instinctive feel for proper doneness.
Soggy Cookies: If your wafers turn to mush rather than achieving that perfect tender-soft texture, you’re likely assembling too far in advance or your custard is too warm during assembly. Ensure custard is fully chilled before layering.
Browning Bananas: Besides the lemon juice trick mentioned earlier, strategically placing bananas against the glass rather than exposed to air helps maintain their appearance. For professional presentations where appearance is crucial, assemble no more than 3 hours before serving.
Conclusion
Banana pudding cups represent the perfect marriage of nostalgic comfort and refined presentation. Their individual portioning solves traditional serving challenges while creating opportunities for creative presentation and flavor customization.
The key to transcendent banana pudding cups lies in respecting the fundamental techniques—properly thickened custard, strategic layering, and thoughtful timing—while allowing yourself creative freedom with variations and presentation.
Whether you’re serving these at an upscale catered event, a family gathering, or in a professional dessert program, these individually portioned treats offer both technical challenge and crowd-pleasing results. The humble banana pudding, when elevated with professional technique and quality ingredients, proves that sometimes the most impressive culinary creations are simply refined versions of dishes we’ve always loved.
Freqeuntly Asked Questions
How far in advance can banana pudding cups be made?
The custard can be prepared up to 3 days ahead and stored with plastic wrap directly on its surface. Complete assembly no more than 6-8 hours before serving for optimal texture and appearance. If necessary to prepare further ahead, consider slicing bananas just before serving and inserting them into pre-layered cups of custard and cookies.
My custard isn’t thickening properly. What am I doing wrong?
Insufficient thickening usually stems from inadequate cooking time or temperature. Ensure your mixture reaches the proper temperature (around 180°F) and maintains it briefly to fully activate the cornstarch. Also verify your cornstarch is fresh, as it loses potency over time when improperly stored.
Can this dessert be frozen?
While technically possible to freeze the custard component, I strongly advise against freezing the assembled dessert. The texture of both the wafers and bananas degrades significantly upon thawing. For make-ahead strategies, freeze only the custard base and assemble fresh.
What’s the best way to prevent bananas from browning?
Beyond the lemon juice method, which alters flavor subtly, the most effective approach is strategic placement (against glass or fully enclosed in custard) and timely assembly. Professional kitchens sometimes use a commercial product called Fruit Fresh, but this isn’t necessary for home preparation if timing is managed properly.
Can I make this dessert sugar-free or with alternative sweeteners?
Yes, with adjustments. Erythritol or allulose work well in the custard base with minimal recipe modifications. However, you’ll need to source or make sugar-free vanilla wafers, which presents more challenge. The texture may differ slightly as sugar contributes to more than just sweetness in the original recipe.

Food lover, recipe creator & the heart behind NoshCrafters.com. Olivia shares mouthwatering, easy-to-make dishes that turn everyday meals into unforgettable bites. When she’s not experimenting in the kitchen, she’s busy plating up inspiration for home cooks everywhere.